
X-rays in the patient record: order, explanations, access
X-rays easily get lost between folders, USB sticks and computers. Here is how to keep them in order in the patient record and use them to explain treatment.
Almost every dental treatment plan relies on an X-ray. And yet, in many practices, X-rays are scattered: some on the computer connected to the X-ray unit, others on a USB stick brought in by the patient, others emailed by an imaging centre or photographed on a phone. When the dentist needs last year's X-ray, the search can take longer than the appointment.
Below you will find a few practical rules for keeping X-rays in order, patient by patient, and for using them when explaining things to patients. At the end, we show how this works in Stomatik and, just as importantly, what the software does not do.
One place for each patient's X-rays
The basic rule is simple: all of a patient's X-rays should be found in the same place, next to their record. Wherever they come from:
- taken at the practice, with your own unit;
- taken at an imaging centre, on the dentist's referral;
- brought in by the patient from another practice;
- check images taken during a root canal treatment or after an implant.
When X-rays are kept separately from the record, there is a risk that the dentist makes a decision without seeing the most recent image, or orders a new X-ray simply because the old one cannot be found.
Name and date: the details that matter later
A file called “IMG_4532” tells you nothing a year later. A few simple conventions help enormously:
- The date of the X-ray, not the date it was uploaded. The difference matters when a patient brings in older images.
- The type of image: panoramic, periapical, bitewing, CBCT (or a slice from it).
- The area or tooth, for images that do not cover the whole arch.
- The source, if the image was not taken at the practice.
- The context, where relevant: “before treatment”, “check after root filling”.
Agree these conventions once, write them on a sheet next to the reception computer and have the whole team apply them. A few years on, the difference is clear.
A simple workflow, from X-ray unit to record
Order does not come from a written rule but from a habit repeated every day. A workflow that works in many practices looks something like this:
- the X-ray is taken and its quality checked straight away, so it does not need repeating;
- the image is saved from the X-ray unit's software with the patient's name and the date;
- on the same day, not “at the end of the week”, the image goes into the patient's record;
- the dentist notes briefly in the record what they saw on the X-ray;
- X-rays brought in by patients are added to the record at their first visit, with their real date.
In a practice with several dentists, it is worth agreeing who takes care of this step: the dentist's assistant, reception or the dentist themselves. When everyone thinks someone else is doing it, the images stay on the X-ray unit's computer.
A detail that is often overlooked: when a dentist takes over a patient from a colleague, the first thing they look for is the latest X-ray. If it is in the record, with its date and type, the handover happens without unnecessary questions for the patient.
The X-ray as a tool for explaining
For a dentist, an X-ray is read in a few seconds. For a patient, it is a grey image in which they recognise nothing. That is exactly why the way you show it matters:
- Zoom in on the area you are discussing, so the patient knows where to look.
- Adjust contrast and brightness so the lesion is visible even to an untrained eye.
- Mark directly on the image what you want to show: decay, a lesion at the root tip, bone available for an implant.
- Compare two images from different points in time, so the patient sees how things have changed.
A patient who has seen the problem on the X-ray with their own eyes understands more easily why they need treatment. The conversation about the plan and the cost becomes an explanation, not a negotiation.
X-rays and the patient
Patients quite often ask for a copy of their X-rays, for example for a second opinion, for a dentist in another town or simply for their own files. Sending them by email, on a USB stick or through personal messaging apps works, but it raises data protection questions: X-rays are health data.
A tidier option is for patients to have access to their own X-rays in a secure place linked to the practice, where they can view and download them when needed. Exactly how medical data should be passed to patients or to other dentists is a good question to discuss with your lawyer or data protection officer (DPO) as well.
One more useful thing: at the end of the appointment, tell the patient where they can find their X-rays and how to ask for them. Many patients do not know they can ask for a copy, and only look for one when they urgently need it, for example in an emergency in another town.
X-rays in Stomatik
In Stomatik, X-rays sit in the patient record, next to the dental chart, treatments and documents. Here is concretely what you can do (see also the patient record):
Uploading to the patient record
The X-ray is uploaded directly into the patient record, so every image, wherever it comes from, ends up in the same place as the rest of the history.
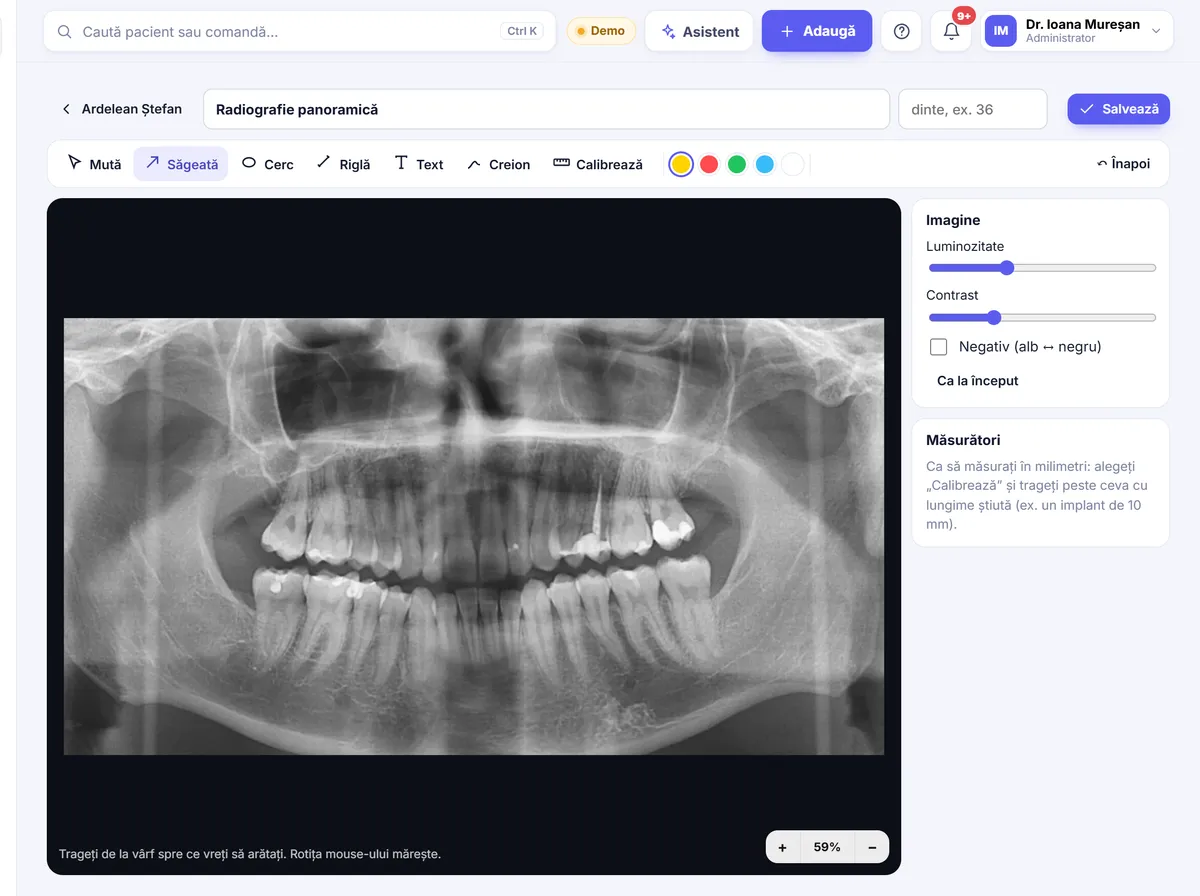
Large view, with the tools you need
The image opens large, and you can use:
- zoom, for the area you are discussing;
- contrast and brightness adjustment;
- image inversion;
- annotations directly on the X-ray;
- measurements in millimetres, after calibration.
These are exactly the tools you need to show the patient what you have seen, on the surgery computer or on a tablet.
Patients see their X-rays in their own account
Each patient has a personal account, opened from a link, where they can see their appointments, balance due, invoices, prescriptions, recommendations and X-rays. You no longer need to send images by email or phone every time they ask. The patient account is available in Romanian, English and Hungarian; details under the patient account.
What it looks like at an appointment
The dentist takes the X-ray, exports it from the X-ray unit's software and uploads it to the patient record. On the surgery screen, they open it large, zoom in on the area, adjust the contrast and mark the lesion. If needed, they measure in millimetres, after calibration. Then they move to the dental chart, record the diagnosis on the tooth and prepare the plan. At home, the patient can look at the X-ray again in their account.
The link with the dental chart and the plan
The X-ray, the dental chart and the treatment plan are all in the same record. The dentist can go from the image to the diagnosis on the tooth and then to the plan with options and prices, which the patient receives on their phone.
Everything is done in the browser, on a computer, tablet or phone, with nothing to install, and data is hosted in the European Union. For details on data protection, see Security and GDPR.
Upload a few X-rays to a test record and see how they look when explained to a patient.
Frequently asked questions
Does Stomatik connect directly to the X-ray unit?
No. Stomatik has no direct connection to X-ray sensors or units. The X-ray is exported as an image from the unit's software and uploaded to the patient record.
Does Stomatik open DICOM files?
No. In Stomatik you upload the exported image, not the DICOM file.
Can I take measurements on an X-ray?
Yes. After calibration, you can measure in millimetres directly on the image, along with zoom, contrast, brightness, inversion and annotations.
Can patients see their X-rays?
Yes. Patients see their X-rays in their personal account, opened from a link, alongside their appointments, invoices and prescriptions.
How should I name X-rays?
It helps to record the date of the X-ray, the type of image, the area or tooth and the source, if it was not taken at the practice.